Background
[wp_ad_camp_5]
This article shows an sample Dialog window in JSF. It also showcases some basic field validation and the display of error messages.
Software Environment
- Windows 7 Professional SP1
- Eclipse – Kepler Release
- Java 1.7 (1.7.0_67 – Windows x86)
- JSF 2.2
- Downloaded, and referenced as part of a Dynamic Web Project in Eclipse
- Primefaces 4.0
- Downloaded from www.primefaces.org
- Place it in the project in WebContent\WEB-INF\lib and reference it
First, Show The Dialog Window
Normally, the dialog windows exist as separate reusable xhtml files that you include into a parent page. This is also a good practice. For example:
1 2 3 4 5 | ... </h:form> <ui:include src="dialog/dialogWindow1.xhtml" /> <ui:include src="dialog/dialogWindow2.xhtml" /> </html> |
When these files contain forms, i.e., <h:form></h:form>, make sure the include statements are outside of the parent’s <h:form></h:form> tags.
A Sample Dialog Window
[wp_ad_camp_4]
Assume this file is dialogWindow1.xhtml. The contents are as follow.
1 2 3 4 5 6 7 8 9 10 11 12 13 14 15 16 17 18 19 20 21 22 23 24 25 26 27 28 29 30 31 32 33 34 35 36 37 38 39 40 41 42 43 44 45 46 47 48 49 50 51 52 53 54 55 56 57 58 59 60 61 62 63 64 65 66 | <!DOCTYPE html PUBLIC "-//W3C//DTD XHTML 1.0 Transitional//EN" "http://www.w3.org/TR/xhtml1/DTD/xhtml1-transitional.dtd"> <html xmlns="http://www.w3.org/1999/xhtml" xmlns:h="http://java.sun.com/jsf/html" xmlns:ui="http://java.sun.com/jsf/facelets" xmlns:p="http://primefaces.org/ui" xmlns:f="http://java.sun.com/jsf/core"> <ui:composition> <p:dialog id = "vpBankAccountDialog" idgetVar = "wgVpAccountDocument" header = "Demo Dialog" position = "center" resizable="false" modal = "true" appendTo="@(body)" scrollable="true" width="800"> <h:form id="fsztkegufr"> <b><p:outputLabel>Demo</p:outputLabel> </b> <h:panelGrid columns="1" style="align:right"> <!-- This is using primefaces namespace --> <p:message id="msg012" for="bankAccountNumber" style="color:red" autoUpdate="true" /> <!-- This is using jsf namespace --> <h:message id="msg022" for="bankAccountName" style="color:red" autoUpdate="true" /> <br/> <p:messages style="color:red" autoUpdate="true" /> </h:panelGrid> <h:panelGrid columns="4" width="100%" columnClasses="label,content,label,content"> <p:outputLabel value="Bank Account #:" /> <p:inputText id="bankAccountNumber" required = "true" requiredMessage = "Bank Account # is required" label = "bankAccountNumber" value = "#{bankAccountController.currentFormData.accountNo}" /> <p:outputLabel /> <p:outputLabel /> <p:outputLabel value="Account Name:" /> <p:inputText id="bankAccountName" required = "true" requiredMessage = "Account name is required" label = "bankAccountName" value = "#{bankAccountController.currentFormData.accountName}" /> <p:outputLabel /> <p:outputLabel /> </h:panelGrid> <br /> <br /> <h:panelGrid columns="2" style="align:right"> <!-- dtBankDocuments is a data table on the parent page --> <p:commandButton id="cbSaveNewBankDocument" value = "#{msg['wawf.application.button.save']}" process = "@([id$=fsztkegufr])" actionListener = "#{bankAccountController.addSave}" oncomplete = "if (!args.validationFailed) PF('wgVpAccountDocument').hide();" update = "@([id$=dtBankDocuments], [id$=fsztkegufr])" /> <p:commandButton id="cbCancelNewBankDocument" value = "#{msg['wawf.application.button.cancel']}" process = "@this" oncomplete = "PF('wgVpAccountDocument').hide();" /> </h:panelGrid> </h:form> </p:dialog> </ui:composition> </html> |
This page is invoked in the parent page. A sample code snippet would be:
1 2 3 4 5 | <p:commandButton id="cbAddAccount" icon="ui-icon-extlink" value="Add" action="#{bankAccountController.addNew}" process="@this" oncomplete="PF('wgVpAccountDocument').show();" update="@([id$=vpBankAccountDialog])"/> |
Notice the ID “wgVpBankDocument” is used to reference and displays our dialog window.
Field Validation
Field validation is enabled using the required attribute. For example:
1 2 3 4 5 | <p:inputText id="bankAccountName" required = "true" requiredMessage = "Account name is required" label = "bankAccountName" value = "#{bankAccountController.currentFormData.accountName}" /> |
In relation to this attribute, there is the requiredMessage attribute. The value of this is what gets displayed when an no value is supplied to the text field when the form is submitted.
Display the Error Messages
The error messages can be displayed individually or as a group. As a group, we use the messages tag. For example:
[wp_ad_camp_2]
1 | <p:messages style="color:red" autoUpdate="true" /> |
Here, we do not specify for which field the message is for. All messages for each field are grouped and displayed as a single unit.

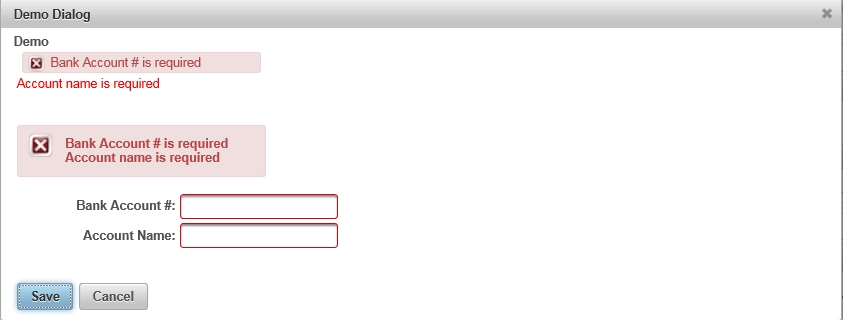
To display individual message, we use the message (no ‘S’, singular noun) tag. On the image above, the first two messages are displayed individually. The first message uses the message tag from Primefaces namespace; while the second message uses the JSF/HTML namespace.
The third message contains the same messages above but are grouped as one unit.
![]()


