This post shows how to create an asynchronous web controller or endpoint in Spring Boot (or Spring in general). The codes won’t use external queues of any kind. However, they’ll use ThreadPoolTaskExecutor to run codes in the background without having a client wait for a response. Why do we need an asynchronous endpoint or web controller? The reason is simple – the processing of data may take longer than the client expects. Instead of making the client wait after it sends a request, our service application sends the response back by calling back the client’s URL at a later time typically, after the processing completes.
Stuff This Post Uses
Although some are optional, these are the following stuff this post uses.
- Windows 10
- Spring Boot 2.5.0
- JDK 11
- Spring Initializr
- IntelliJ IDEA – Optional
Generate Spring Boot Project Using Spring Initialzr
To create an asynchronous web controller in Spring Boot, we use two Java annotations with Spring – @EnableAsync, and @Async. Therefore, it is easier to set our codebase up using Spring Initialzr. First, generate a Spring Boot project using Spring Initialzr with Spring Web dependency only. Spring Web allows us the use the @RestController annotation. Then, our pom.xml may look something like the following, where we only have two dependencies – Spring Boot Starter Web and Spring Boot Starter Test.
1 2 3 4 5 6 7 8 9 10 11 12 13 14 15 16 17 18 19 20 21 22 23 24 25 26 27 28 29 30 31 32 33 34 35 36 37 38 | <?xml version="1.0" encoding="UTF-8"?> <project xmlns="http://maven.apache.org/POM/4.0.0" xmlns:xsi="http://www.w3.org/2001/XMLSchema-instance" xsi:schemaLocation="http://maven.apache.org/POM/4.0.0 https://maven.apache.org/xsd/maven-4.0.0.xsd"> <modelVersion>4.0.0</modelVersion> <parent> <groupId>org.springframework.boot</groupId> <artifactId>spring-boot-starter-parent</artifactId> <version>2.5.0</version> <relativePath/> <!-- lookup parent from repository --> </parent> <groupId>com.turreta.springboot.asynchronous.app</groupId> <artifactId>spring-boot-asynchronous-controller</artifactId> <version>0.0.1-SNAPSHOT</version> <name>spring-boot-asynchronous-controller</name> <description>Demo project for Spring Boot</description> <properties> <java.version>11</java.version> </properties> <dependencies> <dependency> <groupId>org.springframework.boot</groupId> <artifactId>spring-boot-starter-web</artifactId> </dependency> <dependency> <groupId>org.springframework.boot</groupId> <artifactId>spring-boot-starter-test</artifactId> <scope>test</scope> </dependency> </dependencies> <build> <plugins> <plugin> <groupId>org.springframework.boot</groupId> <artifactId>spring-boot-maven-plugin</artifactId> </plugin> </plugins> </build> </project> |
Spring Boot Asynchronous Codes
In reality, there is no asynchronous controller (or controller methods) because we need to respond to the client as soon as possible with HTTP 20x. Meaning, if we had to convert an existing synchronous endpoint to an asynchronous, we retain the controller’s method’s signature and immediately respond. What we instead do is create a service class with an asynchronous method. Then, before the controller responded to the client, it calls that other class’ asynchronous method. Get the picture so far? If yes, then we proceed with more codes.
Next, we need to create a Java configuration class. We could modify an existing configuration class, but a separate class would make things neat.
1 2 3 4 5 6 7 8 9 10 11 12 13 14 15 16 17 18 19 20 21 22 23 24 | package com.turreta.springboot.asynchronous.app.springbootasynchronouscontroller; import org.springframework.context.annotation.Bean; import org.springframework.context.annotation.Configuration; import org.springframework.scheduling.annotation.EnableAsync; import org.springframework.scheduling.concurrent.ThreadPoolTaskExecutor; import java.util.concurrent.Executor; @Configuration @EnableAsync public class AsynchronousConfiguration { @Bean(name = "asyncTaskExecutor") public Executor asyncExecutor() { ThreadPoolTaskExecutor executor = new ThreadPoolTaskExecutor(); executor.setCorePoolSize(3); executor.setMaxPoolSize(3); executor.setQueueCapacity(100); executor.setThreadNamePrefix("AsynchTaskThread-"); executor.initialize(); return executor; } } |
Underneath, asynchronous methods use Thread.
Next, we create a class with a public method and annotate it with @Async. For our purpose, we annotate the class with @Service.
1 2 3 4 5 6 7 8 9 10 11 12 13 14 15 16 17 18 19 20 21 22 | package com.turreta.springboot.asynchronous.app.springbootasynchronouscontroller; import org.slf4j.Logger; import org.slf4j.LoggerFactory; import org.springframework.scheduling.annotation.Async; import org.springframework.stereotype.Service; import java.util.concurrent.TimeUnit; @Service public class AsynchronousService { private final static Logger LOGGER = LoggerFactory.getLogger(AsynchronousService.class); @Async("asyncTaskExecutor") public void processData() throws InterruptedException { LOGGER.info("Start processing"); TimeUnit.MINUTES.sleep(1); LOGGER.info("Done!"); } } |
To simulate a long-running process (but not long enough for a job), we shortly pause the operation using TimeUnit.MINUTES.sleep(1). With this, we should see an immediate response from our controller before our async method prints out “Done!”.
Finally, we create our REST controller.
1 2 3 4 5 6 7 8 9 10 11 12 13 14 15 16 17 | package com.turreta.springboot.asynchronous.app.springbootasynchronouscontroller; import org.springframework.beans.factory.annotation.Autowired; import org.springframework.web.bind.annotation.GetMapping; import org.springframework.web.bind.annotation.RestController; @RestController public class SynchronousRestController { @Autowired private AsynchronousService asynchronousService; @GetMapping(value = "/async-test") public void nonAsyncMethod() throws InterruptedException { asynchronousService.processData(); } } |
Testing Our Spring Boot Application Asynchronous REST Controller’
Finally, we can test our Spring Boot application! As you can see on the screenshot below, we immediately received an HTTP response from our endpoint while the application still processes the back-end request.
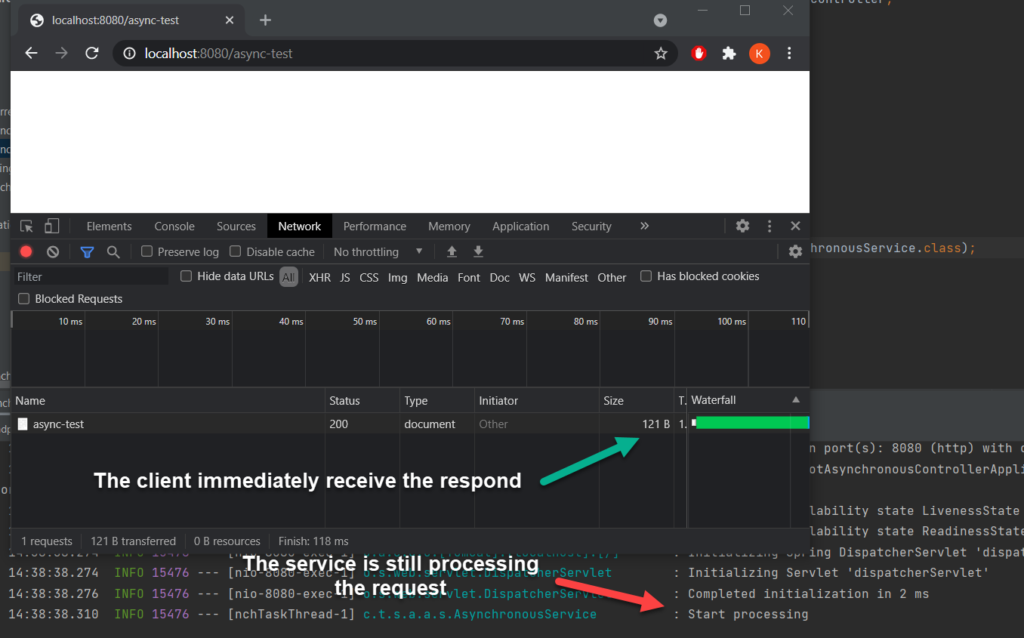
The service application can take its time processing the request and reach out to the client later using callbacks.
![]()