This post shows how to create a Java project with Apache Maven in the command line. The content may be old, and a myriad of people may already know how this, but it is still worth learning the basics.
Requirements
We will use the following items.
- Apache Maven 3.6.3. Download and extract to a directory.
- OpenJDK 11. Download a zip distribution and extract it to another directory.
- Windows 10
Set Up Environment Variables
Before you move on, we need to set up some environment variables so that we can use Apache Maven with OpenJDK 11. On the command line window, run the following commands.
1 2 3 4 5 6 7 8 | # We extracted Apache Maven in C:\Users\karldev\Desktop\apps\apache-maven-3.6.3 set M2_HOME=C:\Users\karldev\Desktop\apps\apache-maven-3.6.3 # We extracted OpenJDK 11 in C:\Users\karldev\Desktop\apps\dcevm-11.0.1+8 set JAVA_HOME=C:\Users\karldev\Desktop\apps\dcevm-11.0.1+8 # Finally, we set PATH set PATH=%PATH%;%M2_HOME%\bin;%JAVA_HOME%\bin |
Then, change to a directory where we want to create a Java project using Apache Maven.
Create Java Project From Maven Archetype
Apache Maven archetypes are Java project templates from which we can choose. To create a Java project, we use the following one-line command.
1 2 3 4 5 6 | mvn archetype:generate \ -DarchetypeGroupId={archetype-groupId} \ -DarchetypeArtifactId={maven-template} \ -DinteractiveMode=false \ -DgroupId={project-packaging} \ -DartifactId={project-name} |
Consider the following usage. Note that it is a single-line command.
1 2 3 4 5 6 | mvn archetype:generate -DarchetypeGroupId=org.apache.maven.archetypes -DarchetypeArtifactId=maven-archetype-simple -DinteractiveMode=false -DgroupId=com.turreta.mavenproj -DartifactId=com-turreta-mavenproj |
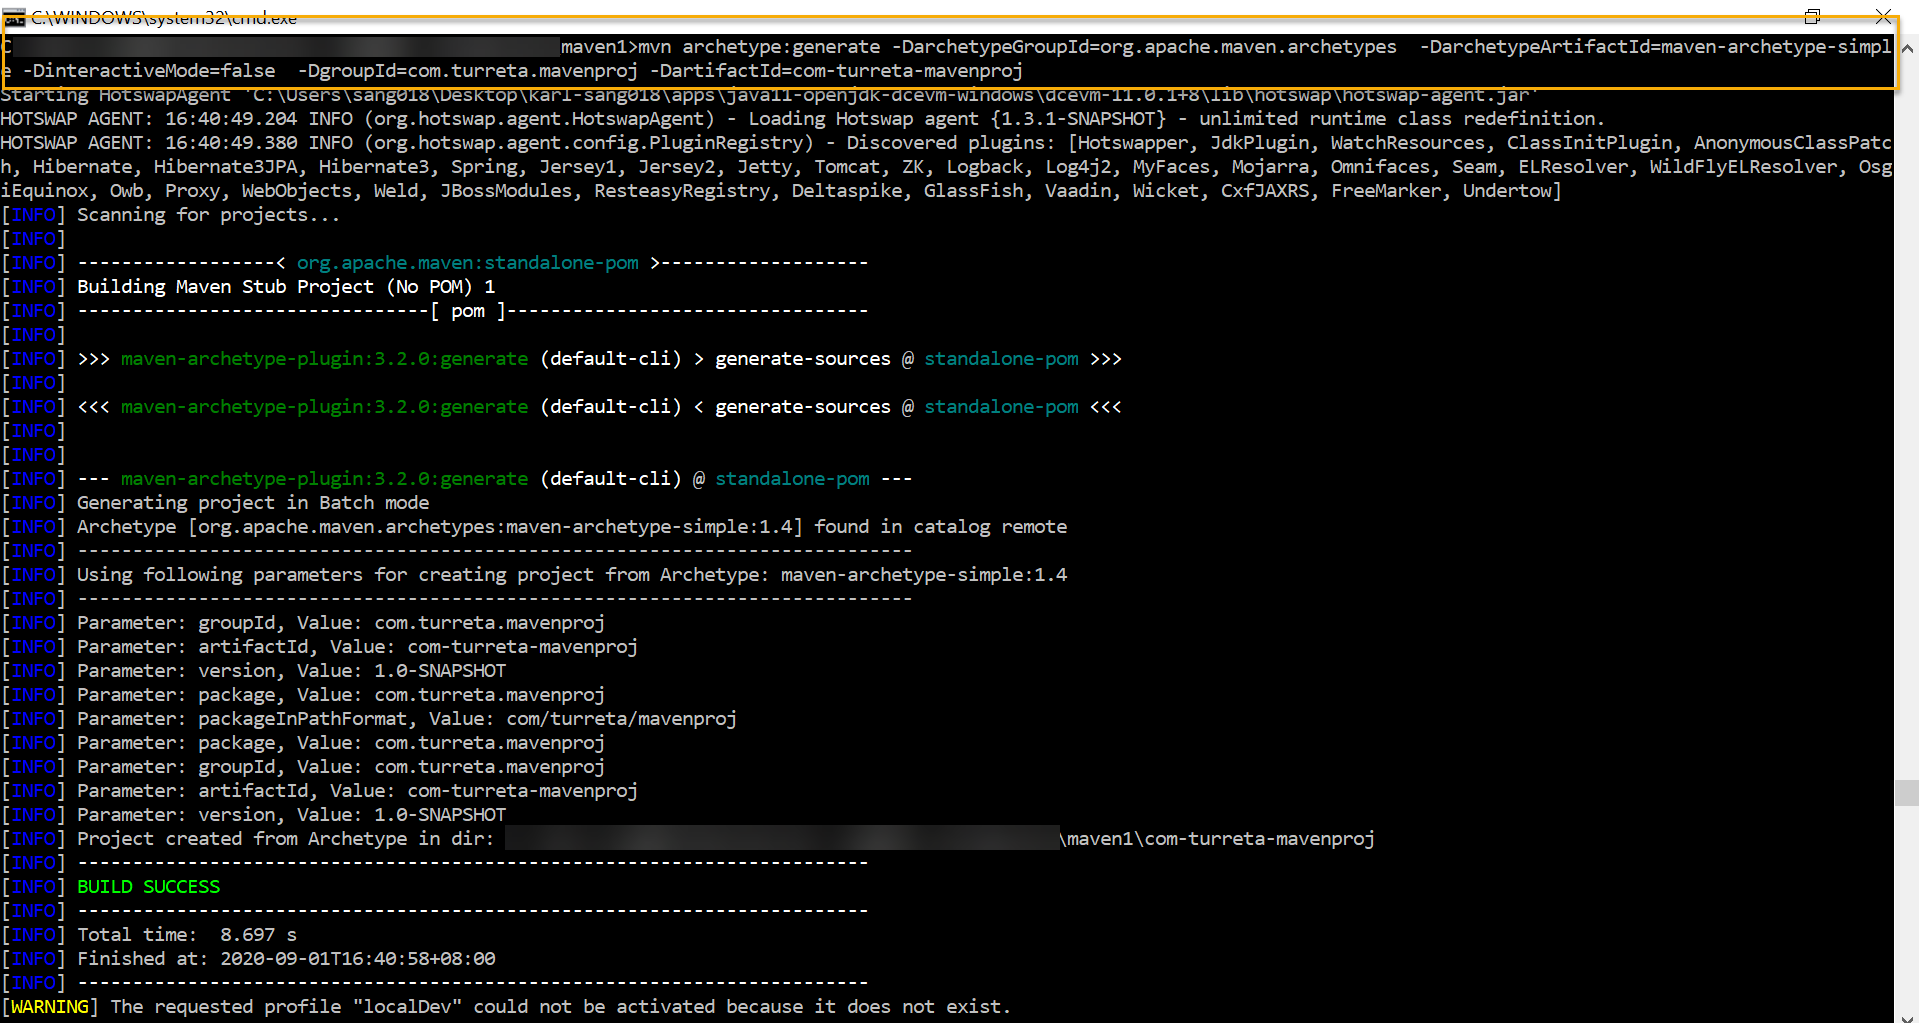
Once we successfully created a Java project, change the directory to the com-turreta-mavenproj directory.
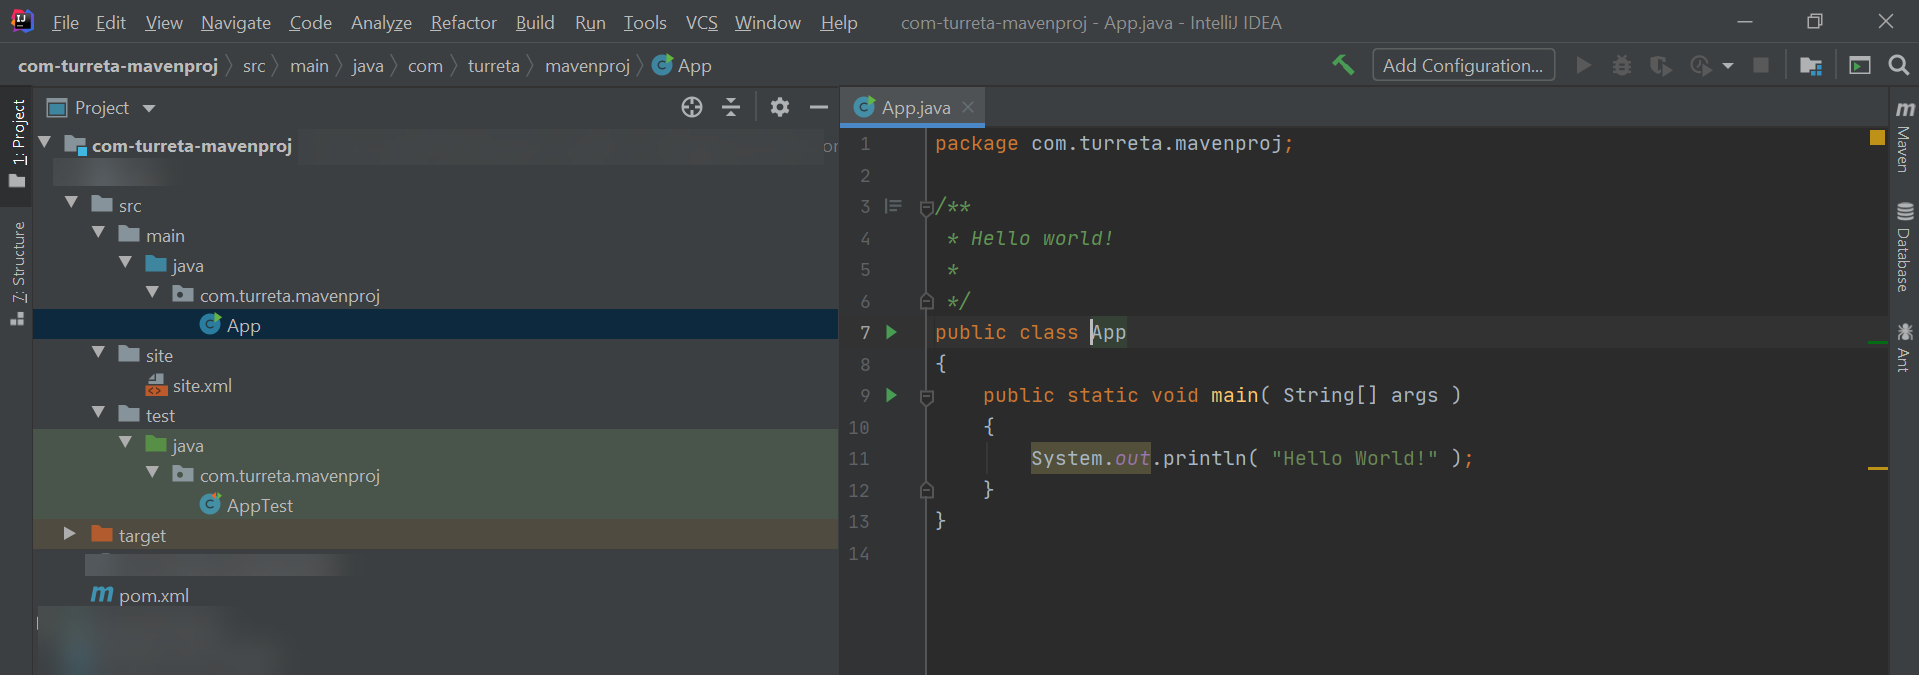
Directory Structure Created By Maven
When we create a Java project, we get the following directory structure and files – excluding the target directory. Maven creates that directory when it builds the whole project.
Other Apache Maven Commands For Our Java Project
Without using an IDE, there are many things we can do without Java project using Apache Maven commands. The following commands are the ones programmers commonly use.
To delete the target directory, use the following command.
1 | mvn clean |
Sample usage.
1 2 3 4 5 6 7 8 9 10 11 12 13 14 15 16 17 18 19 | C:\Users\karldev\Desktop\maven1\com-turreta-mavenproj>mvn clean Starting HotswapAgent 'C:\Users\karldev\Desktop\apps\java11-openjdk-dcevm-windows\dcevm-11.0.1+8\lib\hotswap\hotswap-agent.jar' HOTSWAP AGENT: 17:43:45.687 INFO (org.hotswap.agent.HotswapAgent) - Loading Hotswap agent {1.3.1-SNAPSHOT} - unlimited runtime class redefinition. HOTSWAP AGENT: 17:43:45.859 INFO (org.hotswap.agent.config.PluginRegistry) - Discovered plugins: [Hotswapper, JdkPlugin, WatchResources, ClassInitPlugin, AnonymousClassPatch, Hibernate, Hibernate3JPA, Hibernate3, Spring, Jersey1, Jersey2, Jetty, Tomcat, ZK, Logback, Log4j2, MyFaces, Mojarra, Omnifaces, Seam, ELResolver, WildFlyELResolver, OsgiEquinox, Owb, Proxy, WebObjects, Weld, JBossModules, ResteasyRegistry, Deltaspike, GlassFish, Vaadin, Wicket, CxfJAXRS, FreeMarker, Undertow] [INFO] Scanning for projects... [INFO] [INFO] ------------< com.turreta.mavenproj:com-turreta-mavenproj >------------- [INFO] Building com-turreta-mavenproj 1.0-SNAPSHOT [INFO] --------------------------------[ jar ]--------------------------------- [INFO] [INFO] --- maven-clean-plugin:3.1.0:clean (default-clean) @ com-turreta-mavenproj --- [INFO] Deleting C:\Users\karldev\Desktop\maven1\com-turreta-mavenproj\target [INFO] ------------------------------------------------------------------------ [INFO] BUILD SUCCESS [INFO] ------------------------------------------------------------------------ [INFO] Total time: 0.329 s [INFO] Finished at: 2020-09-01T17:43:47+08:00 [INFO] ------------------------------------------------------------------------ [WARNING] The requested profile "localDev" could not be activated because it does not exist. |
To compile our codes, run the following command.
1 | mvn compile |
When we run the command, we get the following output on the console.
1 2 3 4 5 6 7 8 9 10 11 12 13 14 15 16 17 18 19 20 21 22 23 24 | C:\Users\karldev\Desktop\maven1\com-turreta-mavenproj>mvn compile Starting HotswapAgent 'C:\Users\karldev\Desktop\apps\java11-openjdk-dcevm-windows\dcevm-11.0.1+8\lib\hotswap\hotswap-agent.jar' HOTSWAP AGENT: 17:44:53.396 INFO (org.hotswap.agent.HotswapAgent) - Loading Hotswap agent {1.3.1-SNAPSHOT} - unlimited runtime class redefinition. HOTSWAP AGENT: 17:44:53.579 INFO (org.hotswap.agent.config.PluginRegistry) - Discovered plugins: [Hotswapper, JdkPlugin, WatchResources, ClassInitPlugin, AnonymousClassPatch, Hibernate, Hibernate3JPA, Hibernate3, Spring, Jersey1, Jersey2, Jetty, Tomcat, ZK, Logback, Log4j2, MyFaces, Mojarra, Omnifaces, Seam, ELResolver, WildFlyELResolver, OsgiEquinox, Owb, Proxy, WebObjects, Weld, JBossModules, ResteasyRegistry, Deltaspike, GlassFish, Vaadin, Wicket, CxfJAXRS, FreeMarker, Undertow] [INFO] Scanning for projects... [INFO] [INFO] ------------< com.turreta.mavenproj:com-turreta-mavenproj >------------- [INFO] Building com-turreta-mavenproj 1.0-SNAPSHOT [INFO] --------------------------------[ jar ]--------------------------------- [INFO] [INFO] --- maven-resources-plugin:3.0.2:resources (default-resources) @ com-turreta-mavenproj --- [INFO] Using 'UTF-8' encoding to copy filtered resources. [INFO] skip non existing resourceDirectory C:\Users\karldev\Desktop\maven1\com-turreta-mavenproj\src\main\resources [INFO] [INFO] --- maven-compiler-plugin:3.8.0:compile (default-compile) @ com-turreta-mavenproj --- [INFO] Changes detected - recompiling the module! [INFO] Compiling 1 source file to C:\Users\karldev\Desktop\maven1\com-turreta-mavenproj\target\classes [INFO] ------------------------------------------------------------------------ [INFO] BUILD SUCCESS [INFO] ------------------------------------------------------------------------ [INFO] Total time: 1.084 s [INFO] Finished at: 2020-09-01T17:44:55+08:00 [INFO] ------------------------------------------------------------------------ [WARNING] The requested profile "localDev" could not be activated because it does not exist. |
To run all unit tests within our codes, use the following command.
1 | mvn test |
We get the following output when we run the command.
1 2 3 4 5 6 7 8 9 10 11 12 13 14 15 16 17 18 19 20 21 22 23 24 25 26 27 28 29 30 31 32 33 34 35 36 37 38 39 40 41 42 43 44 45 46 | C:\Users\karldev\Desktop\maven1\com-turreta-mavenproj>mvn test Starting HotswapAgent 'C:\Users\karldev\Desktop\apps\java11-openjdk-dcevm-windows\dcevm-11.0.1+8\lib\hotswap\hotswap-agent.jar' HOTSWAP AGENT: 17:50:04.824 INFO (org.hotswap.agent.HotswapAgent) - Loading Hotswap agent {1.3.1-SNAPSHOT} - unlimited runtime class redefinition. HOTSWAP AGENT: 17:50:04.999 INFO (org.hotswap.agent.config.PluginRegistry) - Discovered plugins: [Hotswapper, JdkPlugin, WatchResources, ClassInitPlugin, AnonymousClassPatch, Hibernate, Hibernate3JPA, Hibernate3, Spring, Jersey1, Jersey2, Jetty, Tomcat, ZK, Logback, Log4j2, MyFaces, Mojarra, Omnifaces, Seam, ELResolver, WildFlyELResolver, OsgiEquinox, Owb, Proxy, WebObjects, Weld, JBossModules, ResteasyRegistry, Deltaspike, GlassFish, Vaadin, Wicket, CxfJAXRS, FreeMarker, Undertow] [INFO] Scanning for projects... [INFO] [INFO] ------------< com.turreta.mavenproj:com-turreta-mavenproj >------------- [INFO] Building com-turreta-mavenproj 1.0-SNAPSHOT [INFO] --------------------------------[ jar ]--------------------------------- [INFO] [INFO] --- maven-resources-plugin:3.0.2:resources (default-resources) @ com-turreta-mavenproj --- [INFO] Using 'UTF-8' encoding to copy filtered resources. [INFO] skip non existing resourceDirectory C:\Users\karldev\Desktop\maven1\com-turreta-mavenproj\src\main\resources [INFO] [INFO] --- maven-compiler-plugin:3.8.0:compile (default-compile) @ com-turreta-mavenproj --- [INFO] Nothing to compile - all classes are up to date [INFO] [INFO] --- maven-resources-plugin:3.0.2:testResources (default-testResources) @ com-turreta-mavenproj --- [INFO] Using 'UTF-8' encoding to copy filtered resources. [INFO] skip non existing resourceDirectory C:\Users\karldev\Desktop\maven1\com-turreta-mavenproj\src\test\resources [INFO] [INFO] --- maven-compiler-plugin:3.8.0:testCompile (default-testCompile) @ com-turreta-mavenproj --- [INFO] Changes detected - recompiling the module! [INFO] Compiling 1 source file to C:\Users\karldev\Desktop\maven1\com-turreta-mavenproj\target\test-classes [INFO] [INFO] --- maven-surefire-plugin:2.22.1:test (default-test) @ com-turreta-mavenproj --- [INFO] [INFO] ------------------------------------------------------- [INFO] T E S T S [INFO] ------------------------------------------------------- [WARNING] Corrupted STDOUT by directly writing to native stream in forked JVM 1. See FAQ web page and the dump file C:\Users\karldev\Desktop\maven1\com-turreta-mavenproj\target\surefire-reports\2020-09-01T17-50-07_098-jvmRun1.dumpstream [INFO] JdkPlugin, WatchResources, ClassInitPlugin, AnonymousClassPatch, Hibernate, Hibernate3JPA, Hibernate3, Spring, Jersey1, Jersey2, Jetty, Tomcat, ZK, Logback, Log4j2, MyFaces, Mojarra, Omnifaces, Seam, ELResolver, WildFlyELResolver, OsgiEquinox, Owb, Proxy, WebObjects, Weld, JBossModules, ResteasyRegistry, Deltaspike, GlassFish, Vaadin, Wicket, CxfJAXRS, FreeMarker, Undertow] [INFO] Running com.turreta.mavenproj.AppTest [INFO] Tests run: 1, Failures: 0, Errors: 0, Skipped: 0, Time elapsed: 0.005 s - in com.turreta.mavenproj.AppTest [INFO] [INFO] Results: [INFO] [INFO] Tests run: 1, Failures: 0, Errors: 0, Skipped: 0 [INFO] [INFO] ------------------------------------------------------------------------ [INFO] BUILD SUCCESS [INFO] ------------------------------------------------------------------------ [INFO] Total time: 2.974 s [INFO] Finished at: 2020-09-01T17:50:08+08:00 [INFO] ------------------------------------------------------------------------ [WARNING] The requested profile "localDev" could not be activated because it does not exist. |
When we want to package our codes as a jar file, we use the following command.
1 | mvn package |
And we get the following output.
1 2 3 4 5 6 7 8 9 10 11 12 13 14 15 16 17 18 19 20 21 22 23 24 25 26 27 28 29 30 31 32 33 34 35 36 37 38 39 40 41 42 43 44 45 46 47 | C:\Users\karldev\Desktop\maven1\com-turreta-mavenproj>mvn package Starting HotswapAgent 'C:\Users\karldev\Desktop\apps\java11-openjdk-dcevm-windows\dcevm-11.0.1+8\lib\hotswap\hotswap-agent.jar' HOTSWAP AGENT: 17:54:32.313 INFO (org.hotswap.agent.HotswapAgent) - Loading Hotswap agent {1.3.1-SNAPSHOT} - unlimited runtime class redefinition. HOTSWAP AGENT: 17:54:32.501 INFO (org.hotswap.agent.config.PluginRegistry) - Discovered plugins: [Hotswapper, JdkPlugin, WatchResources, ClassInitPlugin, AnonymousClassPatch, Hibernate, Hibernate3JPA, Hibernate3, Spring, Jersey1, Jersey2, Jetty, Tomcat, ZK, Logback, Log4j2, MyFaces, Mojarra, Omnifaces, Seam, ELResolver, WildFlyELResolver, OsgiEquinox, Owb, Proxy, WebObjects, Weld, JBossModules, ResteasyRegistry, Deltaspike, GlassFish, Vaadin, Wicket, CxfJAXRS, FreeMarker, Undertow] [INFO] Scanning for projects... [INFO] [INFO] ------------< com.turreta.mavenproj:com-turreta-mavenproj >------------- [INFO] Building com-turreta-mavenproj 1.0-SNAPSHOT [INFO] --------------------------------[ jar ]--------------------------------- [INFO] [INFO] --- maven-resources-plugin:3.0.2:resources (default-resources) @ com-turreta-mavenproj --- [INFO] Using 'UTF-8' encoding to copy filtered resources. [INFO] skip non existing resourceDirectory C:\Users\karldev\Desktop\maven1\com-turreta-mavenproj\src\main\resources [INFO] [INFO] --- maven-compiler-plugin:3.8.0:compile (default-compile) @ com-turreta-mavenproj --- [INFO] Nothing to compile - all classes are up to date [INFO] [INFO] --- maven-resources-plugin:3.0.2:testResources (default-testResources) @ com-turreta-mavenproj --- [INFO] Using 'UTF-8' encoding to copy filtered resources. [INFO] skip non existing resourceDirectory C:\Users\karldev\Desktop\maven1\com-turreta-mavenproj\src\test\resources [INFO] [INFO] --- maven-compiler-plugin:3.8.0:testCompile (default-testCompile) @ com-turreta-mavenproj --- [INFO] Nothing to compile - all classes are up to date [INFO] [INFO] --- maven-surefire-plugin:2.22.1:test (default-test) @ com-turreta-mavenproj --- [INFO] [INFO] ------------------------------------------------------- [INFO] T E S T S [INFO] ------------------------------------------------------- [WARNING] Corrupted STDOUT by directly writing to native stream in forked JVM 1. See FAQ web page and the dump file C:\Users\karldev\Desktop\maven1\com-turreta-mavenproj\target\surefire-reports\2020-09-01T17-54-34_276-jvmRun1.dumpstream [INFO] JdkPlugin, WatchResources, ClassInitPlugin, AnonymousClassPatch, Hibernate, Hibernate3JPA, Hibernate3, Spring, Jersey1, Jersey2, Jetty, Tomcat, ZK, Logback, Log4j2, MyFaces, Mojarra, Omnifaces, Seam, ELResolver, WildFlyELResolver, OsgiEquinox, Owb, Proxy, WebObjects, Weld, JBossModules, ResteasyRegistry, Deltaspike, GlassFish, Vaadin, Wicket, CxfJAXRS, FreeMarker, Undertow] [INFO] Running com.turreta.mavenproj.AppTest [INFO] Tests run: 1, Failures: 0, Errors: 0, Skipped: 0, Time elapsed: 0.006 s - in com.turreta.mavenproj.AppTest [INFO] [INFO] Results: [INFO] [INFO] Tests run: 1, Failures: 0, Errors: 0, Skipped: 0 [INFO] [INFO] [INFO] --- maven-jar-plugin:3.0.2:jar (default-jar) @ com-turreta-mavenproj --- [INFO] ------------------------------------------------------------------------ [INFO] BUILD SUCCESS [INFO] ------------------------------------------------------------------------ [INFO] Total time: 2.614 s [INFO] Finished at: 2020-09-01T17:54:36+08:00 [INFO] ------------------------------------------------------------------------ [WARNING] The requested profile "localDev" could not be activated because it does not exist. |
Notice that the package command does compilation and runs the tests. In Apache Maven, there is the concept of the build lifecycle, and it has seven phases that we can use with our Java project.
- validate – validates the whole project
- compile – validates the entire project and compiles the codes
- test – performs the first two phases and run the unit tests
- package – it does the early three steps and packages the byte-code files in a jar file
- verify – it does the first four phases and run integration tests if there are any
- install – does the early five phases and install the jar file into the local repository
- deploy – same as install but deploys the jar file to a remote repository
This post is part of a reboot Java tutorial.
![]()