![]()
This post demonstrates how to install Java 9 on Ubuntu Trusty 64.
Are you ready for Java 9? At the time of writing, it has not been release yet but it will be release very very soon. For the meantime, early-access builds are available for download and testing. As such, this post may be updated in case additional instructions are need to install Java 9 in Ubuntu Trusty 64.
[wp_ad_camp_5]
Requirements
Stuff used for this post.
- Ubuntu Trusty 64
- Java 9
- sudo rights on Ubuntu
- ssh
- putty.exe is used to access Ubuntu box
Installation Steps
- Add the WebUpd8 Oracle Java PPA1sudo add-apt-repository ppa:webupd8team/java
The terminal displays the following:1234567Oracle Java 9 (for both Ubuntu and Debian): http://www.webupd8.org/2015/02/install-oracle-java-9-in-ubuntu-linux.htmlFor JDK9, the PPA uses standard builds from: http://jdk.java.net/9/ (and not the Jigsaw builds!).Important!!! For now, you should continue to use Java 8 because Oracle Java 9 is available as an early access release! You should only use Oracle Java 9 if you explicitly need it, because it may contain bugs and it might not include the latest security patches! Also, some Java options were removed in JDK9, so you may encounter issues with various Java apps. More information and installation instructions (Ubuntu / Linux Mint / Debian): http://www.webupd8.org/2015/02/install-oracle-java-9-in-ubuntu-linux.htmlMore info: https://launchpad.net/~webupd8team/+archive/ubuntu/javaPress [ENTER] to continue or ctrl-c to cancel adding it
Simply press ENTER to proceed with the installation.
[wp_ad_camp_4]123456789gpg: keyring `/tmp/tmpywvfo4do/secring.gpg' createdgpg: keyring `/tmp/tmpywvfo4do/pubring.gpg' createdgpg: requesting key EEA14886 from hkp server keyserver.ubuntu.comgpg: /tmp/tmpywvfo4do/trustdb.gpg: trustdb createdgpg: key EEA14886: public key "Launchpad VLC" importedgpg: no ultimately trusted keys foundgpg: Total number processed: 1gpg: imported: 1 (RSA: 1)OK
From the point, proceed to step 2. - Updates the package lists for upgrades for packages that need upgrading, as well as new packages that have just come to the repositories1sudo apt-get update
The terminal displays the following:1234567891011121314151617181920212223242526272829303132333435363738394041Get:1 http://security.ubuntu.com trusty-security InRelease [65.9 kB]Get:2 http://security.ubuntu.com trusty-security/main Sources [133 kB]Get:3 http://security.ubuntu.com trusty-security/universe Sources [59.4 kB]Get:4 http://security.ubuntu.com trusty-security/main amd64 Packages [628 kB]Ign http://archive.ubuntu.com trusty InReleaseGet:5 http://ppa.launchpad.net trusty InRelease [15.5 kB]Get:6 http://apt.postgresql.org trusty-pgdg InRelease [51.6 kB]Get:7 http://archive.ubuntu.com trusty-updates InRelease [65.9 kB]Get:8 http://ppa.launchpad.net trusty/main amd64 Packages [3,394 B]Get:9 http://apt.postgresql.org trusty-pgdg/main amd64 Packages [70.6 kB]Get:10 http://security.ubuntu.com trusty-security/universe amd64 Packages [172 kB]Get:11 http://ppa.launchpad.net trusty/main Translation-en [1,556 B]Get:12 http://apt.postgresql.org trusty-pgdg/9.4 amd64 Packages [1,901 B]Hit http://archive.ubuntu.com trusty Release.gpgGet:13 http://archive.ubuntu.com trusty-updates/main Sources [400 kB]Get:14 http://security.ubuntu.com trusty-security/main Translation-en [340 kB]Get:15 http://security.ubuntu.com trusty-security/universe Translation-en [99.6 kB]Ign http://apt.postgresql.org trusty-pgdg/9.4 Translation-en_USIgn http://apt.postgresql.org trusty-pgdg/9.4 Translation-enGet:16 http://archive.ubuntu.com trusty-updates/universe Sources [184 kB]Ign http://apt.postgresql.org trusty-pgdg/9.4 Translation-en_US.UTF-8Ign http://apt.postgresql.org trusty-pgdg/main Translation-en_USIgn http://apt.postgresql.org trusty-pgdg/main Translation-enIgn http://apt.postgresql.org trusty-pgdg/main Translation-en_US.UTF-8Get:17 http://archive.ubuntu.com trusty-updates/main amd64 Packages [995 kB]Get:18 http://archive.ubuntu.com trusty-updates/universe amd64 Packages [417 kB]Get:19 http://archive.ubuntu.com trusty-updates/main Translation-en [489 kB]Get:20 http://archive.ubuntu.com trusty-updates/universe Translation-en [223 kB]Hit http://archive.ubuntu.com trusty ReleaseHit http://archive.ubuntu.com trusty/main SourcesHit http://archive.ubuntu.com trusty/universe SourcesHit http://archive.ubuntu.com trusty/main amd64 PackagesHit http://archive.ubuntu.com trusty/universe amd64 PackagesHit http://archive.ubuntu.com trusty/main Translation-enHit http://archive.ubuntu.com trusty/universe Translation-enIgn http://archive.ubuntu.com trusty/main Translation-en_USIgn http://archive.ubuntu.com trusty/main Translation-en_US.UTF-8Ign http://archive.ubuntu.com trusty/universe Translation-en_USIgn http://archive.ubuntu.com trusty/universe Translation-en_US.UTF-8Fetched 4,418 kB in 29s (151 kB/s)Reading package lists... Done
The output depends on how outdated your Ubuntu is. - Install Oracle 91sudo apt-get install oracle-java9-installer
[wp_ad_camp_3]
The terminal displays the following:123456789101112131415161718192021222324252627282930313233343536373839404142434445464748495051525354555657585960616263646566676869707172737475767778798081828384858687888990919293949596979899100101102103104105106107108109110111112113114115116117118119120121122123124125126127128129130131132133134135136137138139140141142143144145146147148149150151152153154155156157158159160161162163164165166167168169170171172173174175176177178179180181182183184185186187188189190191192193194195196197198199200201202203204205206207208209210211212213214215216217218219220Reading package lists... DoneBuilding dependency treeReading state information... DoneThe following packages were automatically installed and are no longer required:chef-zero erubis libxkbfile1 ohai ruby-diff-lcs ruby-erubis ruby-hashieruby-highline ruby-ipaddress ruby-mime-types ruby-mixlib-authenticationruby-mixlib-cli ruby-mixlib-config ruby-mixlib-log ruby-mixlib-shelloutruby-net-ssh ruby-net-ssh-gateway ruby-net-ssh-multi ruby-rackruby-rest-client ruby-sigar ruby-systemu ruby-yajl x11-xkb-utils xfonts-basexserver-common xserver-xorg-coreUse 'apt-get autoremove' to remove them.The following extra packages will be installed:gsfonts-x11 java-common oracle-java9-set-defaultSuggested packages:default-jre equivs binfmt-support visualvm ttf-baekmuk ttf-unfontsttf-unfonts-core ttf-kochi-gothic ttf-sazanami-gothic ttf-kochi-minchottf-sazanami-mincho ttf-arphic-uming firefox firefox-2 iceweaselmozilla-firefox iceape-browser mozilla-browser epiphany-geckoepiphany-webkit epiphany-browser galeon midbrowser moblin-web-browserxulrunner xulrunner-1.9 konqueror chromium-browser midori google-chromeThe following NEW packages will be installed:gsfonts-x11 java-common oracle-java9-installer oracle-java9-set-default0 upgraded, 4 newly installed, 0 to remove and 321 not upgraded.Need to get 174 kB of archives.After this operation, 551 kB of additional disk space will be used.Do you want to continue? [Y/n] yGet:1 http://archive.ubuntu.com/ubuntu/ trusty/main java-common all 0.51 [130 kB]Get:2 http://ppa.launchpad.net/webupd8team/java/ubuntu/ trusty/main oracle-java9-installer all 9b175-1~webupd8~0 [30.9 kB]Get:3 http://ppa.launchpad.net/webupd8team/java/ubuntu/ trusty/main oracle-java9-set-default all 9b175-1~webupd8~0 [4,254 B]Get:4 http://archive.ubuntu.com/ubuntu/ trusty/main gsfonts-x11 all 0.22 [9,108 B]Fetched 174 kB in 1s (88.3 kB/s)Preconfiguring packages ...Selecting previously unselected package java-common.(Reading database ... 90859 files and directories currently installed.)Preparing to unpack .../java-common_0.51_all.deb ...Unpacking java-common (0.51) ...Selecting previously unselected package oracle-java9-installer.Preparing to unpack .../oracle-java9-installer_9b175-1~webupd8~0_all.deb ...Unpacking oracle-java9-installer (9b175-1~webupd8~0) ...Processing triggers for man-db (2.6.7.1-1ubuntu1) ...Processing triggers for hicolor-icon-theme (0.13-1) ...Processing triggers for shared-mime-info (1.2-0ubuntu3) ...Processing triggers for mime-support (3.54ubuntu1.1) ...Setting up java-common (0.51) ...Setting up oracle-java9-installer (9b175-1~webupd8~0) ...No /var/cache/oracle-jdk9-installer/wgetrc file found.Creating /var/cache/oracle-jdk9-installer/wgetrc andusing default oracle-java9-installer wgetrc settings for it.Downloading Oracle Java 9...--2017-07-03 14:03:10-- http://download.java.net/java/jdk9/archive/175/binaries/jdk-9+175_linux-x64_bin.tar.gzResolving download.java.net (download.java.net)... 1.9.56.66, 1.9.56.26Connecting to download.java.net (download.java.net)|1.9.56.66|:80... connected.HTTP request sent, awaiting response... 200 OKLength: 293348230 (280M) [application/x-gzip]Saving to: ‘jdk-9+175_linux-x64_bin.tar.gz’0K ........ ........ ........ ........ ........ ........ 1% 2.23M 2m4s3072K ........ ........ ........ ........ ........ ........ 2% 2.21M 2m4s6144K ........ ........ ........ ........ ........ ........ 3% 2.93M 1m52s9216K ........ ........ ........ ........ ........ ........ 4% 2.19M 1m54s12288K ........ ........ ........ ........ ........ ........ 5% 3.17M 1m47s15360K ........ ........ ........ ........ ........ ........ 6% 3.12M 1m42s18432K ........ ........ ........ ........ ........ ........ 7% 1.66M 1m49s21504K ........ ........ ........ ........ ........ ........ 8% 2.19M 1m49s24576K ........ ........ ........ ........ ........ ........ 9% 3.42M 1m44s27648K ........ ........ ........ ........ ........ ........ 10% 3.28M 1m40s30720K ........ ........ ........ ........ ........ ........ 11% 2.51M 99s33792K ........ ........ ........ ........ ........ ........ 12% 3.06M 96s36864K ........ ........ ........ ........ ........ ........ 13% 3.24M 93s39936K ........ ........ ........ ........ ........ ........ 15% 3.26M 91s43008K ........ ........ ........ ........ ........ ........ 16% 2.98M 89s46080K ........ ........ ........ ........ ........ ........ 17% 2.70M 87s49152K ........ ........ ........ ........ ........ ........ 18% 2.83M 86s52224K ........ ........ ........ ........ ........ ........ 19% 3.33M 84s55296K ........ ........ ........ ........ ........ ........ 20% 3.21M 82s58368K ........ ........ ........ ........ ........ ........ 21% 3.18M 80s61440K ........ ........ ........ ........ ........ ........ 22% 3.13M 79s64512K ........ ........ ........ ........ ........ ........ 23% 3.07M 77s67584K ........ ........ ........ ........ ........ ........ 24% 2.19M 77s70656K ........ ........ ........ ........ ........ ........ 25% 2.12M 77s73728K ........ ........ ........ ........ ........ ........ 26% 3.16M 75s76800K ........ ........ ........ ........ ........ ........ 27% 2.07M 75s79872K ........ ........ ........ ........ ........ ........ 28% 1.75M 76s82944K ........ ........ ........ ........ ........ ........ 30% 1.67M 76s86016K ........ ........ ........ ........ ........ ........ 31% 2.19M 75s89088K ........ ........ ........ ........ ........ ........ 32% 1.78M 75s92160K ........ ........ ........ ........ ........ ........ 33% 2.56M 74s95232K ........ ........ ........ ........ ........ ........ 34% 2.53M 73s98304K ........ ........ ........ ........ ........ ........ 35% 3.13M 71s101376K ........ ........ ........ ........ ........ ........ 36% 3.13M 70s104448K ........ ........ ........ ........ ........ ........ 37% 1.85M 69s107520K ........ ........ ........ ........ ........ ........ 38% 2.76M 68s110592K ........ ........ ........ ........ ........ ........ 39% 3.44M 66s113664K ........ ........ ........ ........ ........ ........ 40% 2.84M 65s116736K ........ ........ ........ ........ ........ ........ 41% 1.42M 65s119808K ........ ........ ........ ........ ........ ........ 42% 2.71M 64s122880K ........ ........ ........ ........ ........ ........ 43% 1.87M 63s125952K ........ ........ ........ ........ ........ ........ 45% 1.72M 62s129024K ........ ........ ........ ........ ........ ........ 46% 2.29M 61s132096K ........ ........ ........ ........ ........ ........ 47% 1.88M 60s135168K ........ ........ ........ ........ ........ ........ 48% 1.09M 61s138240K ........ ........ ........ ........ ........ ........ 49% 1.37M 61s141312K ........ ........ ........ ........ ........ ........ 50% 2.42M 59s144384K ........ ........ ........ ........ ........ ........ 51% 2.08M 58s147456K ........ ........ ........ ........ ........ ........ 52% 1.98M 57s150528K ........ ........ ........ ........ ........ ........ 53% 2.56M 56s153600K ........ ........ ........ ........ ........ ........ 54% 2.28M 54s156672K ........ ........ ........ ........ ........ ........ 55% 2.98M 53s159744K ........ ........ ........ ........ ........ ........ 56% 2.76M 51s162816K ........ ........ ........ ........ ........ ........ 57% 2.77M 50s165888K ........ ........ ........ ........ ........ ........ 58% 2.35M 49s168960K ........ ........ ........ ........ ........ ........ 60% 2.67M 47s172032K ........ ........ ........ ........ ........ ........ 61% 2.87M 46s175104K ........ ........ ........ ........ ........ ........ 62% 2.06M 45s178176K ........ ........ ........ ........ ........ ........ 63% 2.10M 44s181248K ........ ........ ........ ........ ........ ........ 64% 2.29M 42s184320K ........ ........ ........ ........ ........ ........ 65% 1.88M 41s187392K ........ ........ ........ ........ ........ ........ 66% 2.42M 40s190464K ........ ........ ........ ........ ........ ........ 67% 1.60M 39s193536K ........ ........ ........ ........ ........ ........ 68% 2.42M 38s196608K ........ ........ ........ ........ ........ ........ 69% 2.25M 36s199680K ........ ........ ........ ........ ........ ........ 70% 1.63M 35s202752K ........ ........ ........ ........ ........ ........ 71% 1.70M 34s205824K ........ ........ ........ ........ ........ ........ 72% 1.91M 33s208896K ........ ........ ........ ........ ........ ........ 73% 2.32M 32s211968K ........ ........ ........ ........ ........ ........ 75% 1.96M 30s215040K ........ ........ ........ ........ ........ ........ 76% 2.56M 29s218112K ........ ........ ........ ........ ........ ........ 77% 1.76M 28s221184K ........ ........ ........ ........ ........ ........ 78% 1.86M 27s224256K ........ ........ ........ ........ ........ ........ 79% 3.03M 25s227328K ........ ........ ........ ........ ........ ........ 80% 3.11M 24s230400K ........ ........ ........ ........ ........ ........ 81% 2.42M 23s233472K ........ ........ ........ ........ ........ ........ 82% 2.70M 21s236544K ........ ........ ........ ........ ........ ........ 83% 1.91M 20s239616K ........ ........ ........ ........ ........ ........ 84% 2.00M 19s242688K ........ ........ ........ ........ ........ ........ 85% 2.21M 17s245760K ........ ........ ........ ........ ........ ........ 86% 2.03M 16s248832K ........ ........ ........ ........ ........ ........ 87% 2.25M 15s251904K ........ ........ ........ ........ ........ ........ 89% 2.09M 13s254976K ........ ........ ........ ........ ........ ........ 90% 1.65M 12s258048K ........ ........ ........ ........ ........ ........ 91% 1.85M 11s261120K ........ ........ ........ ........ ........ ........ 92% 2.10M 10s264192K ........ ........ ........ ........ ........ ........ 93% 1.65M 8s267264K ........ ........ ........ ........ ........ ........ 94% 1.58M 7s270336K ........ ........ ........ ........ ........ ........ 95% 1.57M 6s273408K ........ ........ ........ ........ ........ ........ 96% 1.07M 4s276480K ........ ........ ........ ........ ........ ........ 97% 1.65M 3s279552K ........ ........ ........ ........ ........ ........ 98% 1.35M 2s282624K ........ ........ ........ ........ ........ ........ 99% 2.07M 0s285696K ........ .... 100% 1.65M=2m8s2017-07-03 14:05:19 (2.18 MB/s) - ‘jdk-9+175_linux-x64_bin.tar.gz’ saved [293348230/293348230]Download done.Removing outdated cached downloads...update-alternatives: error: no alternatives for javaupdate-alternatives: using /usr/lib/jvm/java-9-oracle/bin/appletviewer to provide /usr/bin/appletviewer (appletviewer) in auto modeupdate-alternatives: using /usr/lib/jvm/java-9-oracle/bin/idlj to provide /usr/bin/idlj (idlj) in auto modeupdate-alternatives: using /usr/lib/jvm/java-9-oracle/bin/jaotc to provide /usr/bin/jaotc (jaotc) in auto modeupdate-alternatives: using /usr/lib/jvm/java-9-oracle/bin/jar to provide /usr/bin/jar (jar) in auto modeupdate-alternatives: using /usr/lib/jvm/java-9-oracle/bin/jarsigner to provide /usr/bin/jarsigner (jarsigner) in auto modeupdate-alternatives: using /usr/lib/jvm/java-9-oracle/bin/java to provide /usr/bin/java (java) in auto modeupdate-alternatives: using /usr/lib/jvm/java-9-oracle/bin/javac to provide /usr/bin/javac (javac) in auto modeupdate-alternatives: using /usr/lib/jvm/java-9-oracle/bin/javadoc to provide /usr/bin/javadoc (javadoc) in auto modeupdate-alternatives: using /usr/lib/jvm/java-9-oracle/bin/javah to provide /usr/bin/javah (javah) in auto modeupdate-alternatives: using /usr/lib/jvm/java-9-oracle/bin/javap to provide /usr/bin/javap (javap) in auto modeupdate-alternatives: using /usr/lib/jvm/java-9-oracle/bin/javapackager to provide /usr/bin/javapackager (javapackager) in auto modeupdate-alternatives: using /usr/lib/jvm/java-9-oracle/bin/javaws to provide /usr/bin/javaws (javaws) in auto modeupdate-alternatives: using /usr/lib/jvm/java-9-oracle/bin/jcmd to provide /usr/bin/jcmd (jcmd) in auto modeupdate-alternatives: using /usr/lib/jvm/java-9-oracle/bin/jconsole to provide /usr/bin/jconsole (jconsole) in auto modeupdate-alternatives: using /usr/lib/jvm/java-9-oracle/bin/jcontrol to provide /usr/bin/jcontrol (jcontrol) in auto modeupdate-alternatives: using /usr/lib/jvm/java-9-oracle/bin/jdb to provide /usr/bin/jdb (jdb) in auto modeupdate-alternatives: using /usr/lib/jvm/java-9-oracle/bin/jdeprscan to provide /usr/bin/jdeprscan (jdeprscan) in auto modeupdate-alternatives: using /usr/lib/jvm/java-9-oracle/bin/jdeps to provide /usr/bin/jdeps (jdeps) in auto modeupdate-alternatives: using /usr/lib/jvm/java-9-oracle/bin/jhsdb to provide /usr/bin/jhsdb (jhsdb) in auto modeupdate-alternatives: using /usr/lib/jvm/java-9-oracle/bin/jimage to provide /usr/bin/jimage (jimage) in auto modeupdate-alternatives: using /usr/lib/jvm/java-9-oracle/bin/jinfo to provide /usr/bin/jinfo (jinfo) in auto modeupdate-alternatives: using /usr/lib/jvm/java-9-oracle/bin/jjs to provide /usr/bin/jjs (jjs) in auto modeupdate-alternatives: using /usr/lib/jvm/java-9-oracle/bin/jlink to provide /usr/bin/jlink (jlink) in auto modeupdate-alternatives: using /usr/lib/jvm/java-9-oracle/bin/jmap to provide /usr/bin/jmap (jmap) in auto modeupdate-alternatives: using /usr/lib/jvm/java-9-oracle/bin/jmod to provide /usr/bin/jmod (jmod) in auto modeupdate-alternatives: using /usr/lib/jvm/java-9-oracle/bin/jps to provide /usr/bin/jps (jps) in auto modeupdate-alternatives: using /usr/lib/jvm/java-9-oracle/bin/jrunscript to provide /usr/bin/jrunscript (jrunscript) in auto modeupdate-alternatives: using /usr/lib/jvm/java-9-oracle/bin/jshell to provide /usr/bin/jshell (jshell) in auto modeupdate-alternatives: using /usr/lib/jvm/java-9-oracle/bin/jstack to provide /usr/bin/jstack (jstack) in auto modeupdate-alternatives: using /usr/lib/jvm/java-9-oracle/bin/jstat to provide /usr/bin/jstat (jstat) in auto modeupdate-alternatives: using /usr/lib/jvm/java-9-oracle/bin/jstatd to provide /usr/bin/jstatd (jstatd) in auto modeupdate-alternatives: using /usr/lib/jvm/java-9-oracle/bin/jweblauncher to provide /usr/bin/jweblauncher (jweblauncher) in auto modeupdate-alternatives: using /usr/lib/jvm/java-9-oracle/bin/keytool to provide /usr/bin/keytool (keytool) in auto modeupdate-alternatives: using /usr/lib/jvm/java-9-oracle/bin/orbd to provide /usr/bin/orbd (orbd) in auto modeupdate-alternatives: using /usr/lib/jvm/java-9-oracle/bin/pack200 to provide /usr/bin/pack200 (pack200) in auto modeupdate-alternatives: using /usr/lib/jvm/java-9-oracle/bin/policytool to provide /usr/bin/policytool (policytool) in auto modeupdate-alternatives: using /usr/lib/jvm/java-9-oracle/bin/rmic to provide /usr/bin/rmic (rmic) in auto modeupdate-alternatives: using /usr/lib/jvm/java-9-oracle/bin/rmid to provide /usr/bin/rmid (rmid) in auto modeupdate-alternatives: using /usr/lib/jvm/java-9-oracle/bin/rmiregistry to provide /usr/bin/rmiregistry (rmiregistry) in auto modeupdate-alternatives: using /usr/lib/jvm/java-9-oracle/bin/schemagen to provide /usr/bin/schemagen (schemagen) in auto modeupdate-alternatives: using /usr/lib/jvm/java-9-oracle/bin/serialver to provide /usr/bin/serialver (serialver) in auto modeupdate-alternatives: using /usr/lib/jvm/java-9-oracle/bin/servertool to provide /usr/bin/servertool (servertool) in auto modeupdate-alternatives: using /usr/lib/jvm/java-9-oracle/bin/tnameserv to provide /usr/bin/tnameserv (tnameserv) in auto modeupdate-alternatives: using /usr/lib/jvm/java-9-oracle/bin/unpack200 to provide /usr/bin/unpack200 (unpack200) in auto modeupdate-alternatives: using /usr/lib/jvm/java-9-oracle/bin/wsgen to provide /usr/bin/wsgen (wsgen) in auto modeupdate-alternatives: using /usr/lib/jvm/java-9-oracle/bin/wsimport to provide /usr/bin/wsimport (wsimport) in auto modeupdate-alternatives: using /usr/lib/jvm/java-9-oracle/bin/xjc to provide /usr/bin/xjc (xjc) in auto modeupdate-alternatives: using /usr/lib/jvm/java-9-oracle/lib/jexec to provide /usr/bin/jexec (jexec) in auto modeupdate-alternatives: using /usr/lib/jvm/java-9-oracle/bin/javaws.real to provide /usr/bin/javaws.real (javaws.real) in auto modeOracle JDK 9 installed#####Important########To set Oracle JDK9 as default, install the "oracle-java9-set-default" package.E.g.: sudo apt install oracle-java9-set-default.Selecting previously unselected package oracle-java9-set-default.(Reading database ... 90935 files and directories currently installed.)Preparing to unpack .../oracle-java9-set-default_9b175-1~webupd8~0_all.deb ...Unpacking oracle-java9-set-default (9b175-1~webupd8~0) ...Selecting previously unselected package gsfonts-x11.Preparing to unpack .../gsfonts-x11_0.22_all.deb ...Unpacking gsfonts-x11 (0.22) ...Processing triggers for fontconfig (2.11.0-0ubuntu4.1) ...Setting up oracle-java9-set-default (9b175-1~webupd8~0) ...Setting up gsfonts-x11 (0.22) ...
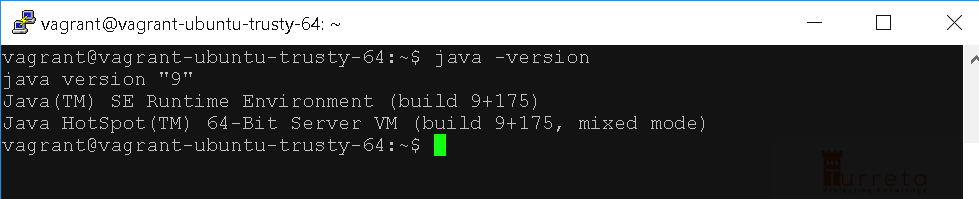
Installation is complete. We can now verify if Java has been properly installed.
Testing
[wp_ad_camp_2]
References
[wp_ad_camp_1]
![]()